Starting a skincare routine when you have acne can feel overwhelming. There are hundreds of products, conflicting advice everywhere, and a fear of making things worse rather than better. The truth is that a simple, consistent routine with the right steps in the right order will do more for acne-prone skin than an expensive complicated one. This step-by-step guide is designed for complete beginners — clear, simple, and effective from day one.
| Did You Know? Dermatologists consistently agree that the three most important steps for acne-prone skin are gentle cleansing, a targeted treatment, and consistent SPF. Everything else is optional. A three-step routine done consistently every day outperforms a ten-step routine done irregularly every time. |
Before You Start: The Beginner Mindset
Two things to accept before beginning any acne routine. First — give every new routine at least six weeks before judging whether it works. Skin cell turnover takes 28 to 45 days, and any treatment needs time to reduce the bacterial load and inflammation beneath the skin surface. Second — start simple. Three products maximum for the first month. Introducing too many new products at once makes it impossible to know what is helping, what is hurting, and what is causing any reactions.
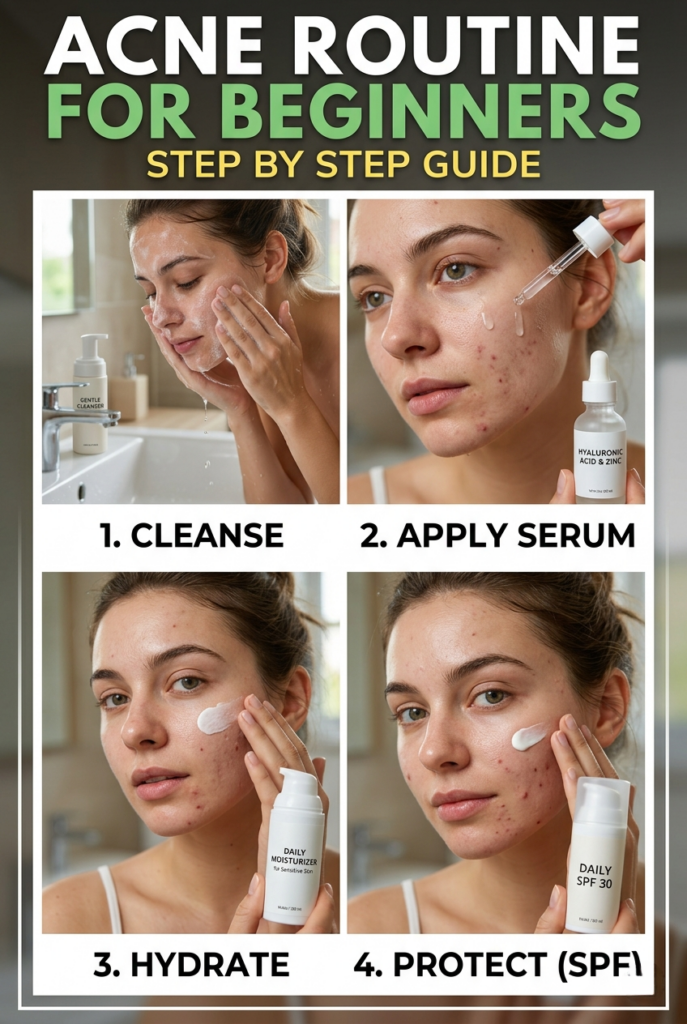
Your Morning Routine — Step by Step
Step 1: Gentle Cleanser — 60 Seconds
Wet your face with lukewarm water — never hot. Apply a small, coin-sized amount of a gentle, pH-balanced gel cleanser. Massage in soft circular motions with your fingertips for a full 60 seconds, paying attention to the forehead, nose, and chin where oil accumulates most. Rinse thoroughly for at least 30 seconds — running fingertips along the hairline and jaw to check for any remaining cleanser. Pat dry with a clean towel. The goal is clean skin without tightness or dryness. If skin feels tight after washing, the cleanser is too harsh.
Step 2: Lightweight Moisturiser
Even acne-prone skin needs hydration. Skipping moisturiser makes skin produce more oil to compensate — making acne worse. Apply a small amount of a lightweight, oil-free, non-comedogenic gel moisturiser to slightly damp skin immediately after cleansing. Damp skin absorbs moisturiser more effectively than dry skin. Use enough to cover the face in a thin even layer without leaving a greasy feeling. Natural alternative: pure aloe vera gel applied directly to damp skin provides lightweight, non-comedogenic hydration with mild acne-fighting benefits.
Step 3: SPF 30 or Higher — Every Single Morning
This is the step most beginners skip — and the one that matters most for long-term skin health. UV exposure worsens acne inflammation, darkens post-acne marks significantly, and undoes the results of every treatment you apply. Use a lightweight, non-comedogenic SPF 30 or higher as the final morning step. Apply it every morning regardless of weather or plans to stay indoors — UV rays penetrate windows and clouds every day of the year.
Your Evening Routine — Step by Step
Step 1: Remove Makeup and Sunscreen First
If you wear makeup or sunscreen during the day, you need to remove it before cleansing. Use micellar water on a cotton pad or a small amount of coconut oil massaged into dry skin to dissolve surface products. This pre-cleanse step ensures your regular cleanser can actually reach and clean the skin rather than just moving product residue around.
Step 2: Gentle Cleanser — Same as Morning
Repeat your morning cleansing routine. The evening cleanse is actually the more important of the two — it removes the full day’s accumulation of oil, bacteria, pollution particles, and product buildup that would otherwise sit on your skin for eight hours overnight, clogging pores and causing new breakouts.
Step 3: Acne Treatment
Apply your chosen acne treatment after cleansing and before moisturiser. For beginners, start with one of these options: a niacinamide serum (5%) applied all over the face — it reduces oil production, kills bacteria, and fades post-acne marks without irritation, making it the safest first acne treatment for beginners. Or diluted tea tree oil (three drops mixed into one teaspoon of jojoba oil) applied to active spots only as a gentler natural alternative. Start with one treatment and use it consistently for six weeks before adding anything else.
Step 4: Moisturiser
Finish with your moisturiser to seal in the treatment and maintain skin barrier health. If your skin feels particularly dry from treatments, use a slightly richer cream at night — skin repairs and regenerates overnight and benefits from more intensive moisturisation during this time.
Weekly Additions That Speed Results
- Exfoliate twice per week after cleansing — use diluted ACV as a toner or a gentle BHA product to dissolve the dead cell buildup that clogs pores
- Use a clay mask once per week to draw out excess oil and deeply cleanse pores
- Change your pillowcase every two to three days
- Clean your phone screen daily with an antibacterial wipe
Your Simple Beginner Routine at a Glance
Morning: Gentle cleanser → Lightweight moisturiser → SPF 30+
Evening: Remove makeup → Gentle cleanser → Acne treatment → Moisturiser
Weekly: Gentle exfoliation twice + clay mask once
| Pro Tip: Photograph your skin in natural lighting on day one and again at week four and week eight. Progress in acne treatment is gradual and easy to miss day by day — but side-by-side photos make it clearly visible and help you stay motivated through the weeks when improvement feels slow. |
You do not need an expensive collection of products to start clearing your skin. You need three simple steps, done twice a day, every day, for six weeks. Start tonight with the evening routine. Your skin will begin responding from the very first consistent week.
Disclaimer: This article is for informational purposes only. Consult a dermatologist for severe, cystic, or persistent acne that does not improve with a consistent gentle routine.